

Create A Simple Submit Form Using JavaScript
This beginner JavaScript tutorial will guide you on creating a simple submit form using few lines of code


Introduction
Today’s post is going to guide you building a basic submit form using Javascript and it will be based on the basic concepts of HTML, CSS and JavaScript that you learnt earlier through my guided posts. The user will be prompted to enter his/her name, surname and email address and after entering the respective details, he will be able to click the submit button to submit the form. This lesson will teach you the basics of creating the fields for entering your name and email id etc while simultaneously doing some basic styling to make your form appear beautiful . You will also learn how to trigger actions in your form by using event function using JavaScript.
Steps to Build the Submit Form
Let’s start creating the form by coding in HTML first and then styling the form. After building the structure of the form and styling it , we will code in JavaScript to trigger the necessary actions for interacting with the user.
HTML Code to Build the Form Structure
<html>

<body>
  <form class =”form”>
    <div>
      <label for=”name”>Name</label>
      <input type=”text” id=”name”>
    </div>
    <div>
      <label for=”surname”>Surname</label>
      <input type=”text” id=”surname”>
    </div>
    <div>
      <label for=”email”>Email</label>
      <input type=”email” id=”email”>
    </div>
    <p>Click on Submit button on to Submit the form</p>
    <div>
      <input id=”submit” type=”submit”>
    </div>
  </form>
</body>

</html>
Explanation for creating Structure of the Form
Firstly, we write the HTML boilerplate. Inside that we first create the form tags and inside the form tags we create three consecutive div tags, each of the div tags will carry the label tags for name, surname and email fields respectively. It will also carry the input tag with a type of “text” as it is going to accept input in the form of text from the user and we assign it with an id of “name”, “surname” and “email” respectively for the name, surname and email fields. Please note that the form element has been assigned a class of form that will be used to style the form in the css code to give it a shape and color etc.
We also create one more pair of div tags to house the input tag for the submit button with a type of “submit” as this is for clicking the submit button and not for accepting text inputs. We also include a p element here with a prompt message for the user to click the submit button . Your HTML code is completed to create a basic form with input fields for name, surname and email id and it also contains the submit button to be clicked by the user. Now, only the structure of the form is complete and it needs to be styled and then make it action oriented.
Time for Styling the Form
In this part we are going to style the form with basic css code as shown below.
.form{
    border: 2px solid black; /* Width, style, and color */
    padding: 20px;          /* Adds space between the border and content */
    border-radius: 10px;    /* Optional: for rounded corners */
  background: black;
  color: white;
}


input[type=”text”] {
    border: 1px solid black; /* A subtle border */
    padding: 10px;           /* Space inside the input field */
    border-radius: 4px;     /* Rounded corners for the input fields */
  margin-bottom:3px;
  margin:2px;


}


input[type=”email”] {
    border: 1px solid black; /* A subtle border */
    padding: 10px;           /* Space inside the input field */
    border-radius: 4px;     /* Rounded corners for the input fields */
  margin-top:2px;

}

#submit {

  color: white;
  margin: 2px;
  font-size: 25px;
  border:7px;
  border-radius:2px;

  background-color: darkcyan; /* Button background color */
    color: white;              /* Text color */
    padding: 10px 20px;        /* Space inside the button */
    border: none;              /* Remove default border */
    border-radius: 5px;        /* Rounded corners for the button */
    cursor: pointer;           /*
}
Explanation for Styling the Form
In the above code, as we need to style the submit button, we grab the submit id that was assigned during the making of the form in html. As you know already, Id is unique to an element so we give the styling to the submit id and whatever styling is done for the submit id , will be done only for the submit button only as it is a unique id.
We use the form class to give the entire form a beautiful border, black background and white colored text and also styled the border of the form so that it has an appropriate border and shape according to the style that we applied in the css code.
For the input fields of text, that is, name and surname, we also style the size of the inpur field as shown above and give the padding and margins to make it look even inside the form. The margin-bottom property is used so that the fields of name and surname does not touch with each other but leaves a slight space in between the two fields or else they will look crowded.
For the input fields of email, that is used for the email address entry, is also styled in the same manner as we style that of the name and surname.
So, now, we have a beautiful form with a black background color and white fields with texts black in color. The button has also been styled to give it a dark cyan color as shown.
When you practise this project, I suggest that you do a different styling so that you get to practise CSS and also have some fun along the way while building this simple but exciting project in HTML, CSS and JavaScript!
Getting the Form To Perform Action
For this part of the project, we need to start coding in JavaScript as shown below.
const form = document.querySelector(”form”);
const para = document.querySelector(”p”);
const name = document.getElementById(”name”);
const surname = document.getElementById(”surname”);
const submit = document.getElementById(”submit”);
const email = document.getElementById(”email”);
form.addEventListener(”submit”, function(event){
  if (name.value === “” || surname.value === “” || email.value === “”) {
    event.preventDefault();
    para.textContent = “ You need to enter full details “;
  } else {
    alert(”Success ! Form submission complete!”);
  }
});
Explanation of the JavaScript code
The first step in using javaScript here is to create variables to store different types of information. So, let’s divide this part into smaller bits.
Creating Variables for Information Storage
We need to create a variable with the name of form to carry the form element with the id of “form”.
Another variable with the name of para to store the paragraph content text inside the p element with an id of “p”.
The name variable is created to store the users’ inputs for the names and the surname variable is created to store the users’ inputs for the surnames.
The submit variable is created for the user to perform the action of clicking on the button .
The email variable is created to help with the storage of email addresses input from the users.
In all the above variables, we used the keyword, const, to create the respective variables that are mentioned above. Usually, in JavaScript, we use the keyword const or let to create variables. In my next post, I will be writing a detailed guide on the differences between let and const keywords in the creation of the variables in JavaScript. For now, we need to know that variables are used in JavaScript to store information as detailed above for this project.
Creating a Function to Perform the Action We Want the Form to do
form.addEventListener(”submit”, function(event){
  if (name.value === “” || surname.value === “” || email.value === “”) {
    event.preventDefault();
    para.textContent = “ You need to enter full details “;
  } else {
    alert(”Success ! Form submission complete!”);
  }
});
I just isolated the function part of the code here in order to explain this in detail.
In JavaScript, addEventListener is a method to take note of an event handler happening on a particular element and this helps in responding to the users’ interaction with the website page. For example, how the page responds when a user clicks on a button, or presses the keyboard key, etc. So, basically, this method helps you to load or trigger events that respond to users’ actions on the web page. In our example, addEventListener method is used on the form element to register event of a user clicking on the submit button, that is considered as a user action, that’s why inside the parenthesis of addEventListener(), we have the parameters, “submit” and function(event).
The addEventListener() is a method in JavaScript pointing to a particular signal or occurence of an event in the browser which you as a developer want to keep track of carefully and thereby respond to it accordingly. Inside the parenthesis of this method, you will find that the first parameter is the string, namely, “submit”, hence you need to remember that this parameter is of data type string and hence it is represented within double or single quotes as shown above. The second parameter inside the parenthesis is actually called a listener or in other words referred to as an “event” or let’s say, a function(event). The event is used to take control of the action of JavaScript and will decide what action will be triggered in the event. As you can see above, the event function is used to call the event.preventDefault() whereby the default window’s browser behaviour is stopped or prevented ( the default behaviour of refreshing of the browser windows and preventing the form from being submitting!) and thereby ensure that whatever data is to be processed, is within the control of the JavaScript event function.
Inside the eventListerner() method, we also include the if-else conditional loop that states the conditional statement that if either the name or surname or the email field is left blank while entering the details by the user, then, the user will be prompted by the alert message with a text that “ You need to enter all the details!” Else in the condition means, if all the fields are entered completed, then, the user is greeted with a prompt message: “ your form submission is complete”. You can write your own style of prompt messages, and what I have quoted as the messages are just my own style of writing text messages for the user prompts.
Hence, what happens is, when the user clicks on the “submit” button, then, an event is triggered, based on the condition of the entry fields, and the form submission is triggered and the submission is successful when the entry fields are complete and failed if any of the fields are not completed. Even if you enter the email id inappropriately, example, if you forget to write the asterisk symbol inside the email entry , then, it will trigger a warning and alert you with the prompt, “you need to write the @ in the email field.”
Remember, functions in JavaScript are always used to trigger actions and perform actionable tasks as per the command that is set inside the function and when the function is called, you get the program to perform the task and interact with the user.
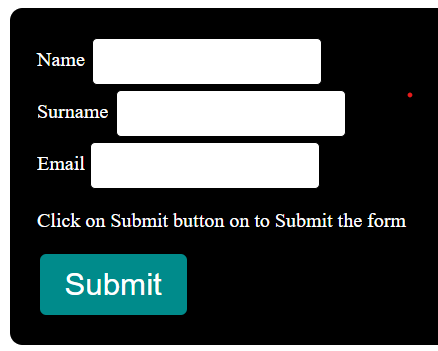
The Final Look of your Submit Form
Conclusion
Congratulations! You just learnt how to create a simple yet beautiful form using HTML, CSS and JavaScript with a step-by-step guide. I would suggest you to practise by building it on your own after going through this post and change the styling of the form to suit your favorite colors and styling accordingly and that will be a good motivation to learn web development in a deeper way. The source code could be found here.
More JavaScript